All of us hobbyists who have multiple tanks think about how to prevent spreading of diseases and parasites and undesirables, like snails and hydra, from tank to tank on nets, algae scrapers, and even filters that we might take off of one tank and put on another.
In public aquariums they solve this dilemma by having a set of siphon tubes, nets, algae pads or scrapers for each aquarium, so there is no sharing of equipment between tanks. I find this a bit expensive and besides I do not have the room for that many duplicate things in my fish room. What we need is a solution we can dip or rinse our aquarium or related equipment in and know it had effectively destroyed any organism we would not want transferred to the next aquarium.
Using Clorox or Alcohol to Sterilize
You can kill disease organisms with Clorox or alcohol or a variety of commercial products, and with care you could even use detergents. I have actually used the clothes washer to clean a bunch of dirty sponge filters (10 in one wash) with laundry detergent. They came out clean, and after two rinses, I had no problem when using them in aquariums with fish and plants. But it initially was a worry that there could be residual detergent in the sponges.
Clorox is easy to use, but you do need to use gloves or your hands will smell like Clorox for a day or longer. Clorox is more effective at higher concentrations but higher concentrations are harder to handle. At moderate concentrations it does not easily kill snails, and for other organisms it needs contact for at least a few minutes to be effective. Residual Clorox is a concern that is usually addressed with extra rinses followed by the use of a chlorine-removing agent, like Prime or sodium hyposulfite or Amquel. Also you do not want to breathe the gases coming off of Clorox for very long. But with the right concentration and the right time of contact Clorox is useful. At low concentrations and short contact time procedures are know for treating plants and fish eggs with Clorox to remove undesirable organisms.
Using Salt to Sterilize
Sodium chloride is common salt and is usually just referred to as salt. It has many advantages over all of the other sanitizers/sterilizers. Really, salt is all you need in the fish room for disinfecting equipment. At low levels it is non-toxic to fish and plants and even has some beneficial effects like helping to prevent velvet outbreaks and promoting the slime coat on fish. At high concentrations it kills snails, leaches (like those that come in with black worms), planaria, hydra, all types of external fish parasites, and all types of bacteria. It also kills residual algae on equipment at high concentrations.
Salt can be used effectively both in its granular form and in solution. In the granular form it can serve as a scouring agent to help remove algae from surfaces before filling the tank back up again. Other than that use, I prefer using salt made into a water solution.
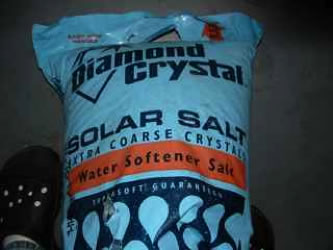
You can buy salt packaged in a number of different ways to make the solution. Kosher salt and non-iodized table salt can be bought in small sizes but is a bit more expensive than others. Ice melting salt is cheap but often contains black solids that look ugly but cause no problems. I like the salt used for water softening. It comes as rock salt or pellets in 40 to 50 pound sacks and is $5 to $7 per bag. See Figure 1.
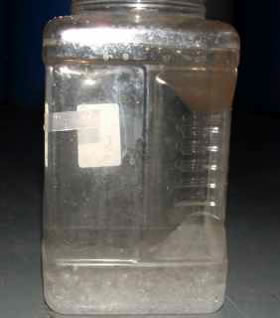
Adding salt to water until no more salt will go into solution forms a saturated salt solution (SSS). I start by adding at least 1200 grams of salt (4 cups is about right) to a gallon jug and then fill the jug with water. Hot water will speed the dissolution process. Stir well and then let set an hour or overnight, and then stir again. If cold water is used, it may take a day or more to prepare the solution if you want to make sure it is really saturated. There must be some undissolved salt on the bottom of the container, meaning that all the salt that will dissolve in the water has been dissolved, and no more will go into solution. Basically that is the definition of a SSS. See Figure 2. Since there is little difference in the amount of salt that will dissolve in hot or cold water, I make the assumption that there is 27-weight % salt contained in the SSS. The gallon of SSS will therefore contain 1244 grams of salt and 3361 grams of water for a total of 4605 grams. A one-cup portion (240 milliliters) of this solution contains 78 grams of salt. This SSS can be used in a variety of ways to disinfect or sterilize while cleaning your aquarium and related equipment.
If you are in a hurry, the salt solution you get by mixing 4 cups of salt with enough water to fill a gallon jug will contain enough salt after 15 minutes of mixing to effectively kill any organisms it comes in contact with. But if you plan to also use it to prepare any of the other solutions mentioned below, you need the SSS. That solution may take a day to form even with occasional stirring.
| Solution | Wt% Salt | Specific Gravity |
Notes |
|---|---|---|---|
| Low Tonic Level (1 tsp/gallon) |
0.13% |
~1.0013 |
Used to prevent velvet, particularly in Kilies or for the fry of most fish |
| High Tonic Level (3 tsp/gallon) |
0.39% |
~1.0039 |
Maximum medicinal dose for freshwater fish |
| Seawater |
3.5% |
1.0250 |
Normal for mis-ocean |
| Atificial Seawater |
3.1% |
1.0210 |
Easier ro maintain marine aquarium at this %salt |
| Brine Shrimp Hatching Solution |
2.5% |
1.0190 |
Baby brine shrimp hatch quicker at this low %salt |
| Brine Shrimp Raising Solution |
4.0% |
1.0286 |
Maximum %salt for raising brine shrimp |
| Saturated Salt Solution (SSS) |
27% |
1.1993 |
Basically nothing can live in this solution (think salt-cured foods) |
The basic thing to note in the above Table 1 is that a SSS contains greater than 7 times more salt than seawater. No animal or plant is going to live in this solution. Even if you are in a rush and only mix for a few minutes, the solution made by contacting 4 cups of salt with water as described will contain enough salt to disinfect your aquarium equipment. You can even disinfect your hands in it.
Using Super Saturated Salt (SSS) to Kill Organisms
First, the SSS can be used straight. Once your aquarium is empty, simply pour in a quart or two of the SSS into the tank. Then using a scrubby pad or even a washcloth, rub down all surfaces of the tank. The SSS will kill any organisms it contacts even in the crevasses between glass and silicone sealant or under the plastic rim. It effectively kills these organisms in a matter of a minute or less. So by the time you have completed scrubbing down all the insides of the tank, and maybe some of the outside, you are ready to drain out the SSS and rinse. A single rinse is sufficient. In fact, just draining can be sufficient since the little bit of salt left will be diluted when you fill the tank and can be beneficial. If you ever have to clean and disinfect a very large aquarium, like a 200 -gallon tank, using a SSS is the way to go. A SSS is nontoxic to you and any residual salt when you are finished does not have to be removed. It can simply be diluted with the water you use to refill the tank.
The recovered SSS from the tank cleaning can be used again and again unless it becomes too diluted with water. It will still be effective even when diluted with an equal volume of water. I run the solution through a fine net to remove snail eggs, snails, and other dead organisms prior to reuse. I am not positive that a SSS will kill snail eggs since the egg cases are fairly tough, but scraping them off the glass likely exposes the eggs sufficiently to kill them.
A SSS offers a great way to sanitize gravel. Drain the gravel as much as possible and then add enough SSS to cover it. Then stir the gravel for a few minutes to make sure the salt comes in contact with each piece of gravel. This offers a way to make sure the gravel from a diseased tank is not used in setting up a tank. Drain out the salt solution and rinse the gravel, if you want, prior to use. Untreated gravel from a healthy tank can be used to reactivate the bioactivity in a newly set up tank.
If you use an algae pad or scraper in more than one tank, you may be transferring diseases and/or undesirable organisms from one tank to another. Between uses if the pad or scraper is submerged in a SSS for a minute or two, it will be clean of disease, snails, etc. and safe for use in the next tank. If the next tank is one that can handle the extra salt there is no need to rinse the pad or scraper. If the tank’s occupants are sensitive to salt, a rinse in tap water should be sufficient.
Nets can be stored in a container of a SSS to disinfect them. But note that salt crystals formed during drying can destroy nets that are not rinsed before drying. So rinse the net in fresh water before drying or just leave the net in the solution until the next use. A dip of the net in the SSS between uses for a minute is also effective.
A SSS can be used to sterilize spawning mops, spawning cones and slates just before use. This makes sure that the spawning site is not going to provide bacterial that might destroy the eggs.
Diluted Super Saturated Salt and Baby Brine Shrimp
A SSS can be diluted to make the salt solution used to hatch baby brine shrimp. To make a liter of this 2.5% salt solution, dilute 94 grams (79 mL)(1/3rd cup) of the SSS with 921 mL (3.8 cups) of water. To make a gallon of this 2.5% salt solution, dilute 362 grams (302mL) (~1.25 cups) of the SSS with 3538 mL (14.75 cups) of water. To verify that the solution is made properly, use a refractometer or other aquarium specific gravity instrument to confirm the specific gravity is close to that wanted, as given in TABLE 1. The reason this lower salt solution causes brine shrimp eggs to hatch quickly is because more water goes into the egg osmotically causing the membrane to burst quicker than it would at higher salt concentrations.
Dosing With Super Saturated Salt to Promote Fish Health
A SSS can be used to dose salt to an aquarium to help promote fish health or to treat some fish diseases. Adding solid salt to the aquarium is not a good thing since the solid goes to the bottom and can take a while to dissolve. The high concentration of salt at the bottom around the undissolved salt can kill any fish or plant that stays in it too long. The correct way to add salt to an aquarium is to add salt as a solution. A SSS is great for this purpose, and because it is a concentrated form of salt, it makes it quick and easy to dose small or large aquariums. The normal dosage is one teaspoon of salt per gallon on the first day. The same amount can be dosed on the second day and then the third day also, if no improvement in the fish is noted. No more than three doses should be used. After a week, do a water change and replace the lost salt if the treatment needs to be continued. For instance, salt treatment for ich or velvet needs to be continued for at least two weeks since the cyst form of ich and ich on the fish cannot be killed by salt. Only the free-swimming form of ich that hatch from the cyst can be killed by salt or any other ich cure.
To dose a 10-gallon aquarium with a therapeutic amount of salt (5 grams or one teaspoon per gallon), first subtract the volume that objects such as sand and ornaments, like driftwood, take up in the aquarium. A typical 10-gallon aquarium will only hold about 8 or 9 gallons of water if it has gravel and is not filled to the top. If it is a bare bottom tank filled to the brim, it probably does contain 10 gallons of water. Assuming there are 10 gallons of water in the tank, add 185 grams (154 mL) (~3/4th cup) of the SSS to the aquarium. This amount should be added slowly (over 15 to 20 seconds) to the most turbulent area of the tank, either to the flow returning from the filter or where there are bubbles rising from a sponge filter or air stone. Extrapolation for dosing larger aquariums is straightforward.
Using Salt to Remove External Parasites or to Treat Ich
One other use of a salt solution is its use to remove external parasites from fish or to treat fin rot or ich or any external injury on a fish. Note that this also gets rid of parasites on the fish’s gills. The solution you should use is equivalent to artificial seawater, or 3.1% salt. If you have a marine aquarium, just use some of that liquid as described below. To prepare one liter of a similar 3.1% salt solution, mix 117 g (98 mL) (0.4 cup) of the SSS with 902 mL of water. Since the salt concentration is not that critical for removing external parasites, the brine shrimp hatching solution can also be used equally as well. This seawater-like solution is then used as a dip. But before you start, prepare the container where you will put the fish once it has been treated.
The fish is caught in a net and dipped in the solution for 30 seconds to 10 minutes or more, depending on the size of the fish. The smaller the fish the shorter the time used for the dip should be. Be prepared to net the fish so it can be removed from the dip solution quickly. Leaving the fish in the net while dipping can result in the parasites being caught in the net. Fish will struggle trying to swim normally in this seawater. If they do not swim, they will float. Once they stop struggling or the time has lapsed, they should immediately be placed in a container of their normal water. They should not be placed back in the aquarium from which they came if you think there are free-swimming parasites still present in that tank.
Since this treatment is time sensitive and if too long, can have a knockout effect on the fish, it may take several minutes for the fish to recover. This procedure is one of the procedures used by public aquariums as part of their quarantine for new fishes since it is so effective at removing parasites. Experience with this method is needed to predict the effective dip times without making it too long. Death of the fish can occur with too long a dip. Until you have that experience, shorter times are better than longer times. Angelfish and characins, for instance, appear to be more sensitive to the salt concentration of seawater. For these fish a more dilute salt solution can be used to rid the fish of external parasites or help heal a wound. A solution made by diluting any of the above mentioned solutions with an equal volume of water should be a good place to start. Fry and young fish should not be dipped.
If you overdo the time you use when you dip a fish in the brine, it may appear dead, but leave it in fresh water for at least 15 minutes to allow it time to revive. They often do. Use water in the revival container that is at the right temperature and other water conditions for the fish. Keep notes so the next time you do not use too long a dip time.
Interestingly, if you want to see firsthand what many fish parasites look like, you can actually collect them in the following manner. Purchase either feeder goldfish or minnows used for bait. A dozen of either or both should be sufficient. Prepare at least a quart of the seawater-like concentration of the salt solution as described above and place the solution is a container with a clear bottom.
Place the goldfish or minnow one at a time in the solution without the net around them so the dead parasites will fall to the bottom. When the fish has been in the solution for about 10 seconds, net the fish out and put in a separate tank containing clean fresh water. After all the fish have been dipped, take a close look at the bottom of the treatment container. You should find a number of different fish parasites dead on the bottom. They can be picked out and viewed under a microscope if desired. Minnows and goldfish from different sources may have different parasites. The reason these fish have so many parasites is that they are raised outdoors in ponds and are therefore exposed to them continuously.
For those who want to know how the SSS can kill these organisms, the answer is dehydration. The high salt content in the SSS compared to the salt content inside the organism causes the water inside the organism to migrate out of the organism because of osmotic pressure. The tougher skin on the fish allows them to survive the treatment for a much longer time that the much smaller undesired organisms. Interestingly if you have parasites on marine fishes, a dip of the marine fish into fresh water kills the parasite because the water osmotically enters the organism and causes their cells to rupture. The fish survive because it has a much tougher skin and is a much larger organism.
A SSS should be found in every fish room for all of the above reasons. A SSS is cheap and easy to make, and by using it, you will be a more successful aquarist.
April 22, 2011